A piezometer or pore pressure meter is one of the extensively used geotechnical instruments. They are primarily used to measure pore pressure in concrete structures, boreholes, rock fills, soil, etc. However, different types of piezometers find their application in the geotechnical or geo-structural study associated with large civil engineering constructions like tall buildings, dams, underground tunnels, etc. We will be discussing the installation procedure of Piezometers in earth/rockfill dams and concrete dams. Let’s get started.
Piezometer Installation Procedure in an earth/rockfill dam using Model EPP-30V
The recommended piezometer for such installation is an Encardio Rite Model EPP-30V Electron Beam Welded heavy-duty piezometer. In an earth and rockfill dam, more than one piezometer and sensors are installed at marked elevations and different cross-sections, as shown in the figure below.
Here, for example, nine piezometers and three soil pressure meters are installed at an elevation of 438 m.
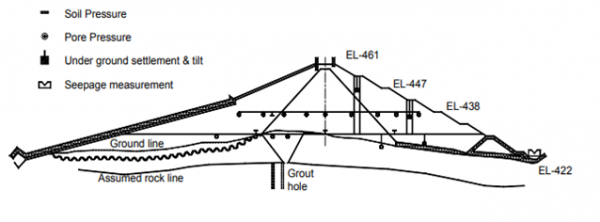
The reason behind installing a group of piezometers is that the monitoring of readings helps to discover the phreatic line and shows how it moves with time till steady-state conditions are attained.
Read more: Vibrating Wire Piezometer – Types and Operating Principle
At any cross-section, the dam is allowed to be filled to an elevation of about 0.5-1 m higher from where the piezometers are to be embedded.
The exact position where the piezometers are to be mounted is cautiously marked. To reach the correct required elevation, offset trenches of about 1m X 1m are dug at these positions. Using a hand shovel, the material around the sensor is placed and pressed down using a light-duty pneumatic or petrol backfill tamper.
The height of the first layer of material shoved over the sensor should be about 250mm, compacted with precision. Using the same method, the sensor should be covered with the material until 500mm of it has been placed.
The 500 mm height permits rubber tire equipment to cross the location. However, if vibratory rollers need to be permitted at the location, the material thickness should be increased to 1m to avoid any discrepancies. In the case of piezometer installation in a foundation, necessary boring is done to the required depth, and installation of the piezometer is done following some listed steps which we have discussed in [Installation of piezometer in a borehole] While installing a foundation piezometer in earth/rockfill or concrete dams, it is advised not to have the junction box and route one continuous cable from the sensor to the observation room. During such cases, cabling is done in the cable trench.
A 400-800mm wide and up to 500 mm deep cable trench should be dug at the left-hand side looking towards the sensors from the trench end side. It is done to route cables from all the sensors at that elevation along the offset trenches as shown in the images below.
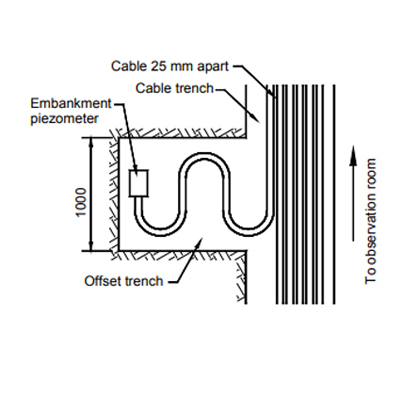
Make sure to keep the ground clear of any sharp rocks or objects that may accidentally damage the cable. Make sure to clean and level the trench with 50 mm of well-graded sand at the bottom of the trench along the path. Decide the depth and width depending on the number of cables the trench has to carry.
The trench runs into the abutment and then along the abutment to the downstream side or directly to the downstream side towards the observation room, depending on the cable layout design. The work of these cable trenches is to carry the individual cables from piezometers to the observation room.
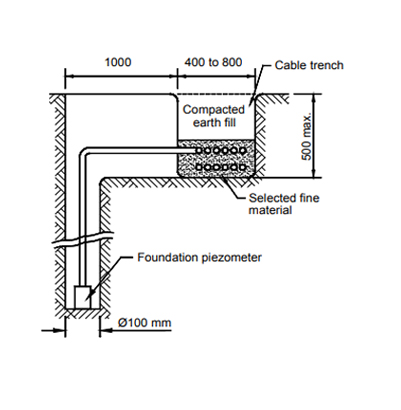
Make sure to keep the ground clear of any sharp objects. The trench should also be thoroughly cleaned and leveled with 30mm of fine sand at the bottom of the trench along the path.
The successive cables should be kept apart by 25-40 mm and a distance of 100 mm must be left free from the sides of the trench. To counter any increase in the length due to settlements, the cables should be placed in a zig=zag manner to provide a uniformly distributed slack of around 0.5 m in a 15 m length of each cable.
NOTE: During installation in embankments, the sensors and cables are embedded in a protective covering of sand or selected fine embankment material. Some installations may involve the positioning of a series of sensors and cables on a ready layer filled with not less than 100 mm of compacted selected fine material.
The prepared layers of compacted material may be placed in a trench or on an exposed ramp. This is done to ascertain an acceptable grade without undue interference with construction operations. For example, when working with rockfill dams and earth fill cores, it is handier to install sensors and cables in trenches in core and fine filter zones, in ramps in a coarse filter, and compacted rockfill shell zones.
In rockfill dams with earth fill cores, for example, it is frequently convenient to install sensors and cables in trenches in core and fine filter zones and ramps in coarse filter and compacted rockfill shell zones. However, in an earth embankment, it is convenient to install in a trench.
This allows sufficient degrees of compaction of backfill to be easily obtained without any damage to the sensor or cable trench. As sensors and cables are covered and compacted, repeated readings should be taken to ensure that they continue to function properly.
NOTE: In case there is more than one layer of cable to be installed in a given array, they should be kept separated from each other at an interval of not less than 100 mm of hand-compacted sand or selected fine embankment material.
NOTE: While following the installation procedure in an earth dam, a plug about 100 mm thick, made of a mixture by volume of 5:95 bentonite and backfill exhibiting a free swell factor of approximately 600% should be placed in a trench at intervals of approximately 10 m, before sealing the trench with the backfill.
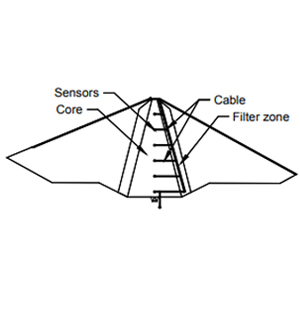
NOTE: Vertical routing of signal cables from sensors should be avoided while working in embankment dams. In case the vertical run of cables cannot happen, they should be routed vertically only through the filter.
The image above shows the preferred method for vertical routing of instrumentation cables through the filter.
Piezometer Installation Procedure in Concrete Dams
Encardio-model EPP-30V Piezometer is recommended for installation in a Concrete Dam. As there is the availability of access galleries in concrete dams, the cable from the sensors is first routed to the gallery. These cables may be terminated in junction boxes inside the gallery. Using a readout unit or a data logger, the data from the various sensors can then be taken out.
If need be, the signals from the junction boxes can be transferred through multi-core cables to any observation room outside the dam structure. Installation in a concrete dam takes place with several piezometers that are installed at a chosen elevation at different cross-sections, along with other sensors. As shown in the figure below, there are three piezometers, five strain rosettes, five no-stress-strain containers, five stress meters, and two temperature meters installed at an elevation of 132 m.
The cables from the sensors are taken to junction boxes and mounted inside one of the cross galleries. It may be that the gallery is above or below the elevation where the sensors are installed. As a general practice, all the cables from sensors at any particular elevation are routed to a vertical shaft on the upstream side of the dam. Through the vertical shaft, the cables are lowered or raised.
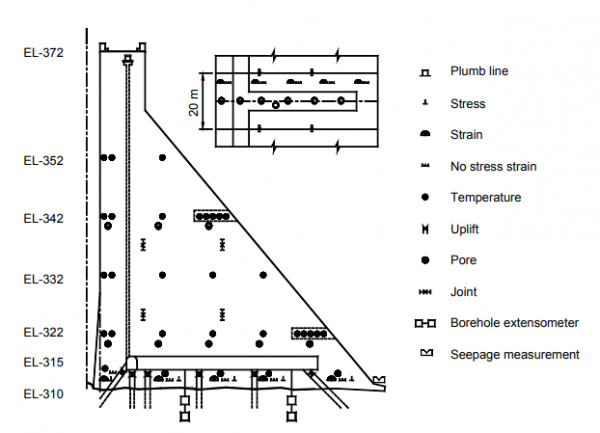
During any cross-section, the filling of the dam is done till around 25 cm higher than where the sensors are to be mounted, leaving 0.5 m x 0.5 m x 25 cm deep trenches at the positions where the sensors are to be placed.
In cases where the instrument has to be installed with other sensors, like the strain rosette and the no-stress strain meter that require more space, a larger trench is left. The route of the cable should be correctly marked, making sure it ends in the vertical shaft and runs parallel to the line of the sensors.
Depending upon 9the number of cables the trench has to transfer, the depth and width of the channel are decided. In case all the cables at an elevation fit in one row, the depth of the channel can be around 10 cm. In case there is more than one row required for the cables, the depth should be increased by 10 cm per row.
Make sure that the channel trench is carefully cleaned and leveled before the cables are laid, taking extra care to free the trench from sharp rocks or objects. A distance of 25 mm should be maintained between successive cables using a wooden cable spacer and cable rake. To keep the settlement and temperature effects in check, the cables are placed in a zigzagged manner, providing a uniformly distributed slack of around 0.5 m in a 15 m length of each cable.
Once the cable is laid down, they are covered with concreted to a depth of 10cm, using a hand shovel. This is necessary to prevent any accidental damage to the cables.
Read more: How Is Vibrating Wire Piezometer Installation Done?
It is important to ensure that the cables are properly tagged, from the point where they come out of the dam to the vertical shaft. It may be that even with every precaution, a mistake may still occur. For Example, Tags may get lost due to the cable getting accidentally cut.
Encardio Rite follows a rule that dictates that looking from the vertical shaft end towards the sensor, the cable from the farthest sensor is always at the left-hand side while the offset trenches are to the right of the channel trench. Following that rule, the cable from the closest sensor is at the extreme right.
CAUTION: Using a tag made with a non-corrosive material like stainless steel or plastic, all cables should be accurately identified by tagging them every 5 m or closer, onwards from the point from which they come out of the dam body into the vertical shaft.
CAUTION: To take care of any settlement and/or contraction of concrete due to temperature effects, the cable should be zigzagged by providing a uniformly distributed slack of around 0.5 m in a 15 m length of each cable.
It is recommended to grout the cable in a vertical shaft at 2m distances so that the left-to-right alignment is maintained. Encardio Rite follows the rule which states that the cable from the most distant sensor at any elevation should be connected to the extreme left socket in the junction box. Succeeding cables from the sensors are connected progressively towards the right in the junction box.
This was all about the Vibrating Wire Piezometer Installation Procedure in Dams. If you have a query or suggestions to make, feel free to drop them in the comments section below.